The previous chapter looked at HTTP traffic from the server's side using access logs, metrics, and traces. All of those are written after a request has already happened. Now, we are going to flip the camera around to your own machine. Here, you can watch a request the exact moment it leaves and the moment it comes back. The best tool for this is already built into your browser: the Network panel in DevTools.
It is the fastest way to answer a simple question: what did this page actually request, and what came back? Better still, almost every concept we have covered so far becomes visible here. The DNS lookup, the TCP connection, the TLS handshake, the cache hit, the redirect chain, and the HTTP version all show up as rows and bars you can click on.
Every major browser includes this tool under slightly different names. In Chrome, Edge, and Firefox, you open DevTools by pressing F12 (or Cmd+Option+I on a Mac, Ctrl+Shift+I on Windows and Linux), then clicking the Network tab. Safari calls it the Web Inspector, which you have to enable once under Settings → Advanced → "Show features for web developers."
Build this habit immediately: the Network panel only records requests that happen while it is open. If you open it after the page has loaded, the table will be empty. The standard workflow is to open DevTools first, reload the page, and watch the rows fill in. You will also see a "Preserve log" checkbox. Leave this checked when you are debugging a page that navigates or redirects. Otherwise, the table wipes itself clean on every new page load, and you lose the exact evidence you were trying to find.
When the page loads, you will see one row per request. A modern web page is rarely just one request. It is usually dozens: the initial HTML document, followed by every stylesheet, script, font, image, and API call that document pulls in. Each row represents one of those requests, and the columns provide a quick summary of what happened.
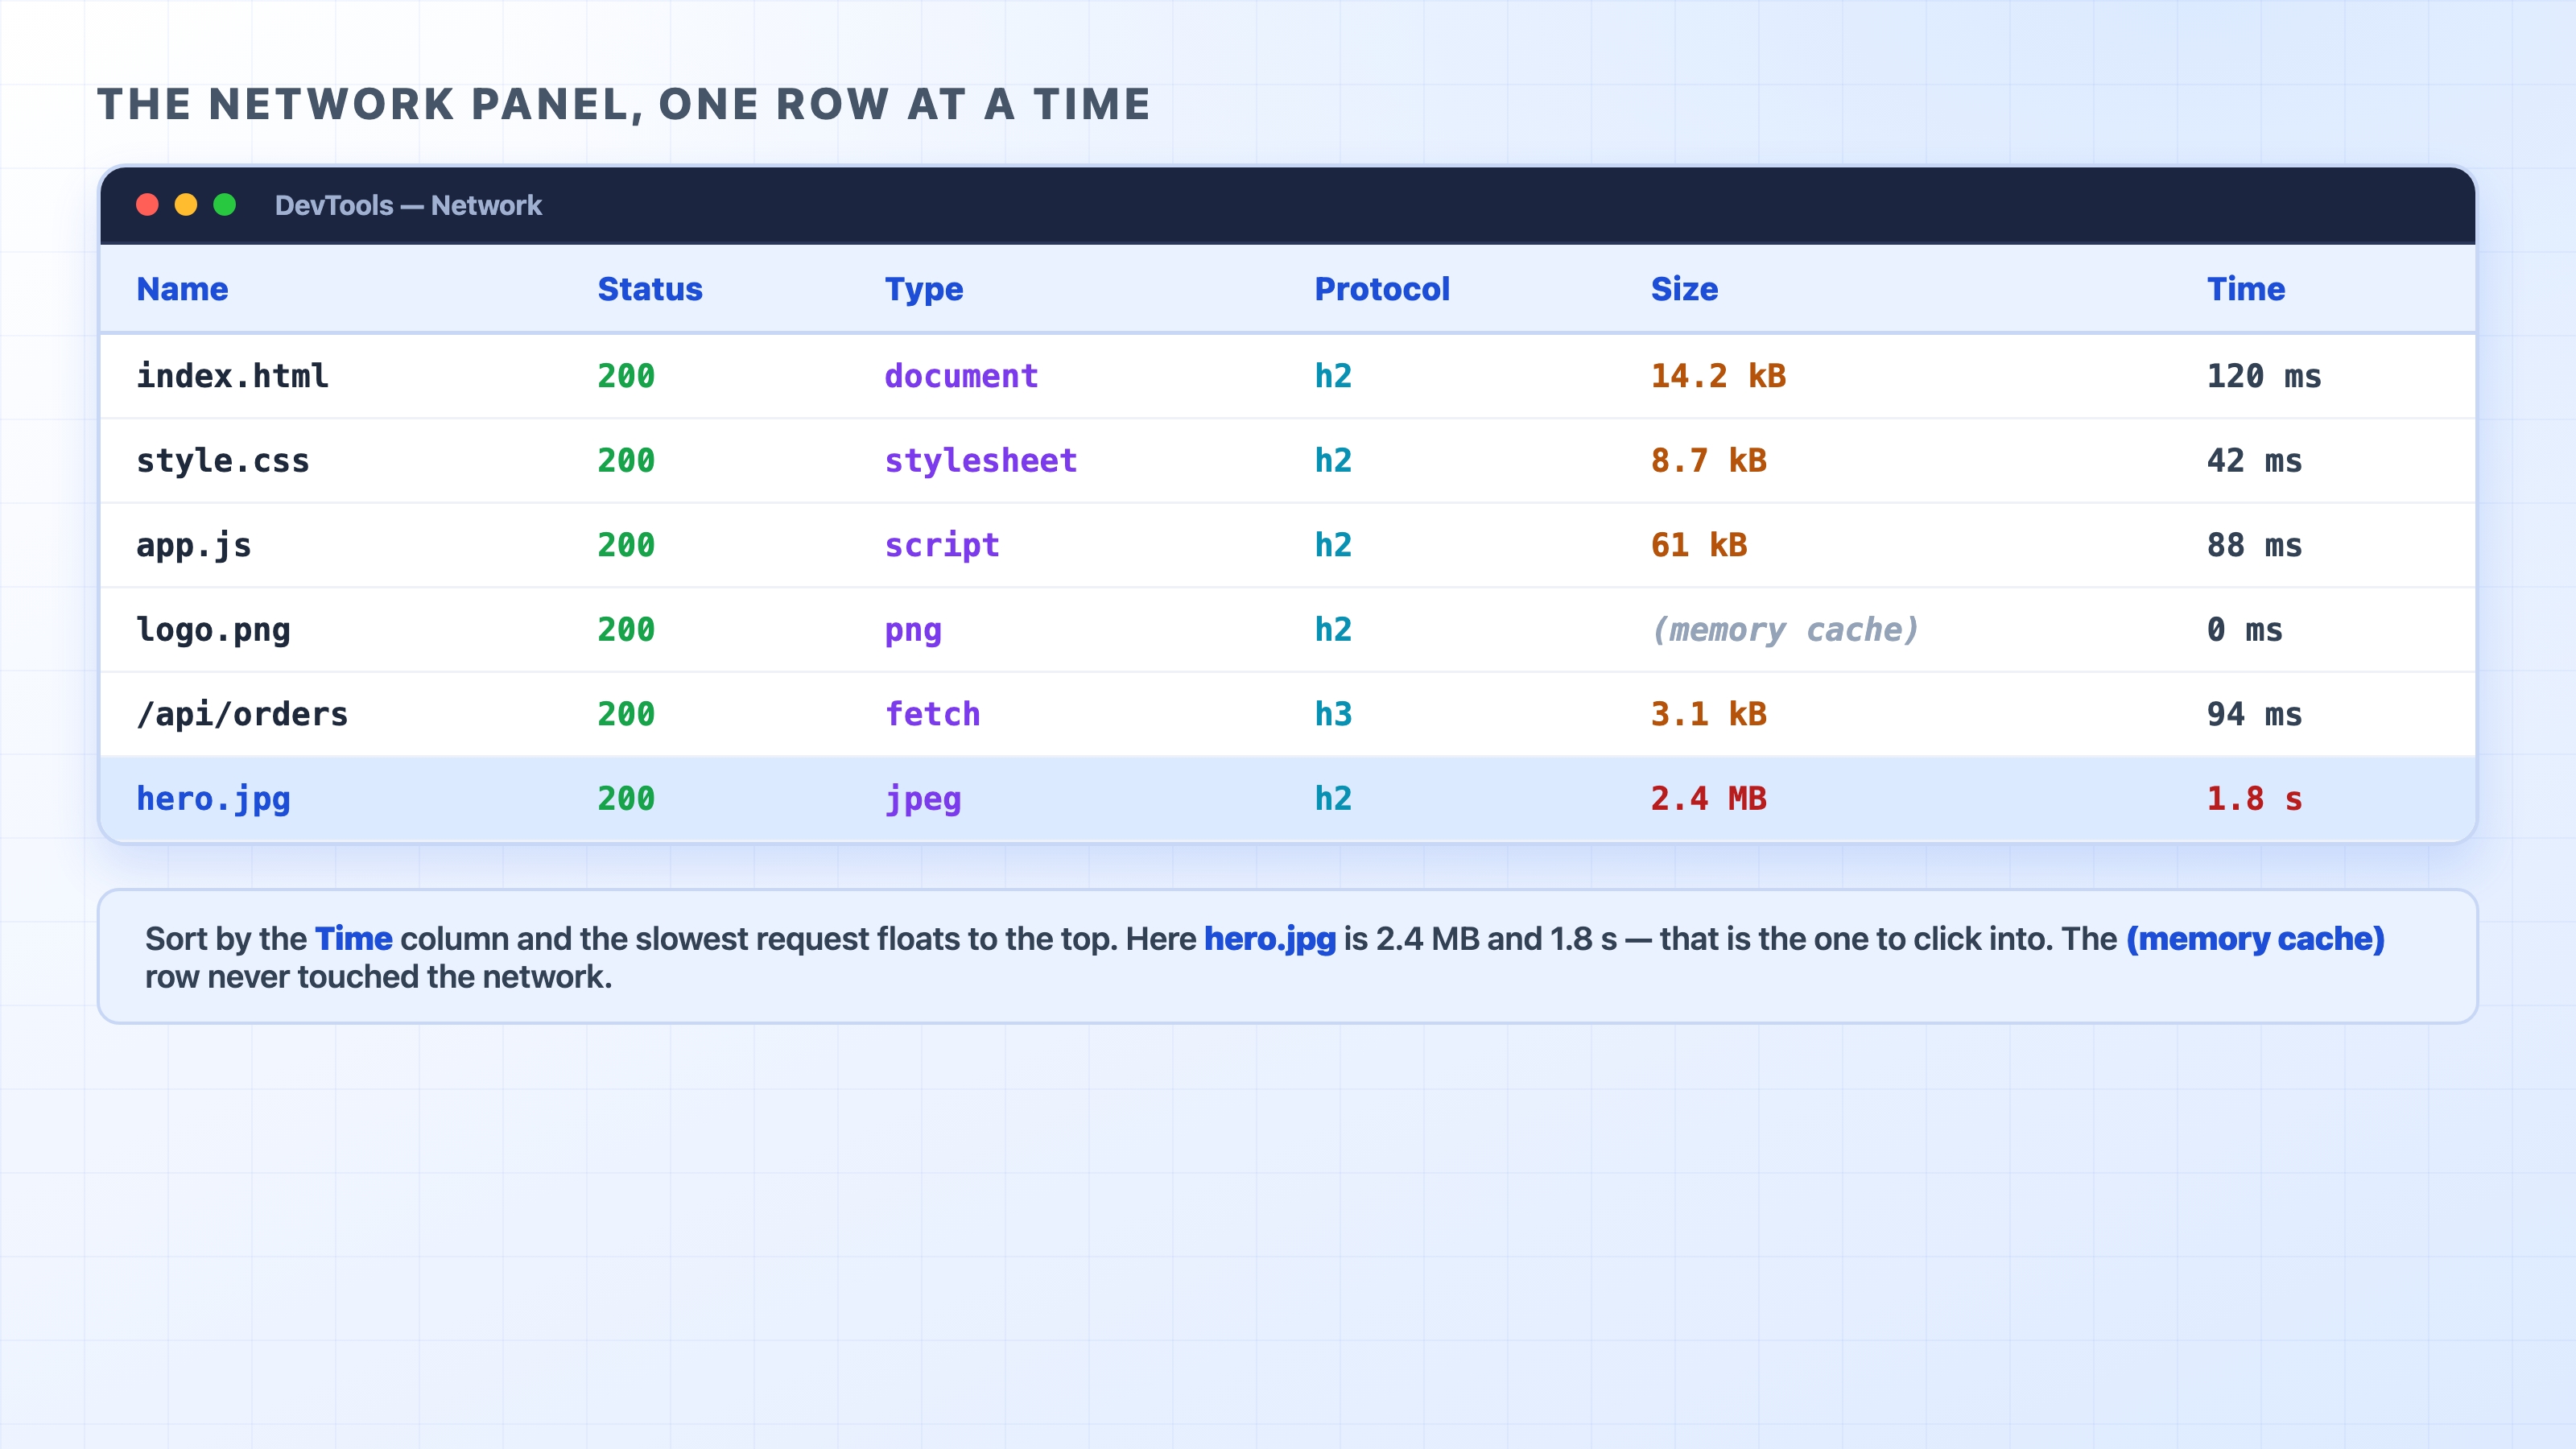
You can show or hide columns by right-clicking the header row. Six of them carry most of the useful information:
style.css, /api/orders/42, or hero.jpg. This is how you find the specific request you care about in a long list.200s is healthy, while a red 404 or 500 jumps out immediately. You will also see 301 or 302 here for redirects, and 304 Not Modified for a successful cache revalidation.document, stylesheet, script, font, or image formats like png and jpeg. API calls usually show up as xhr or fetch. This column is handy for filtering. If you only care about API calls, you can filter by the Fetch/XHR type to hide the rest of the noise.h2 for HTTP/2, h3 for HTTP/3 over QUIC, and http/1.1 for the older standard. This is the easiest way to confirm which version a site negotiated.It is also worth knowing that the filter box at the top of the panel takes plain text. If you type orders, you will only see requests with "orders" in the name. It also accepts special filters like status-code:500 or method:POST. When a page makes a hundred requests, the filter is how you isolate the one that matters.
The table provides a great overview. If you click any row, a detailed view opens beside it, split into tabs. The exact names vary slightly between browsers, but the four most important tabs are consistent:
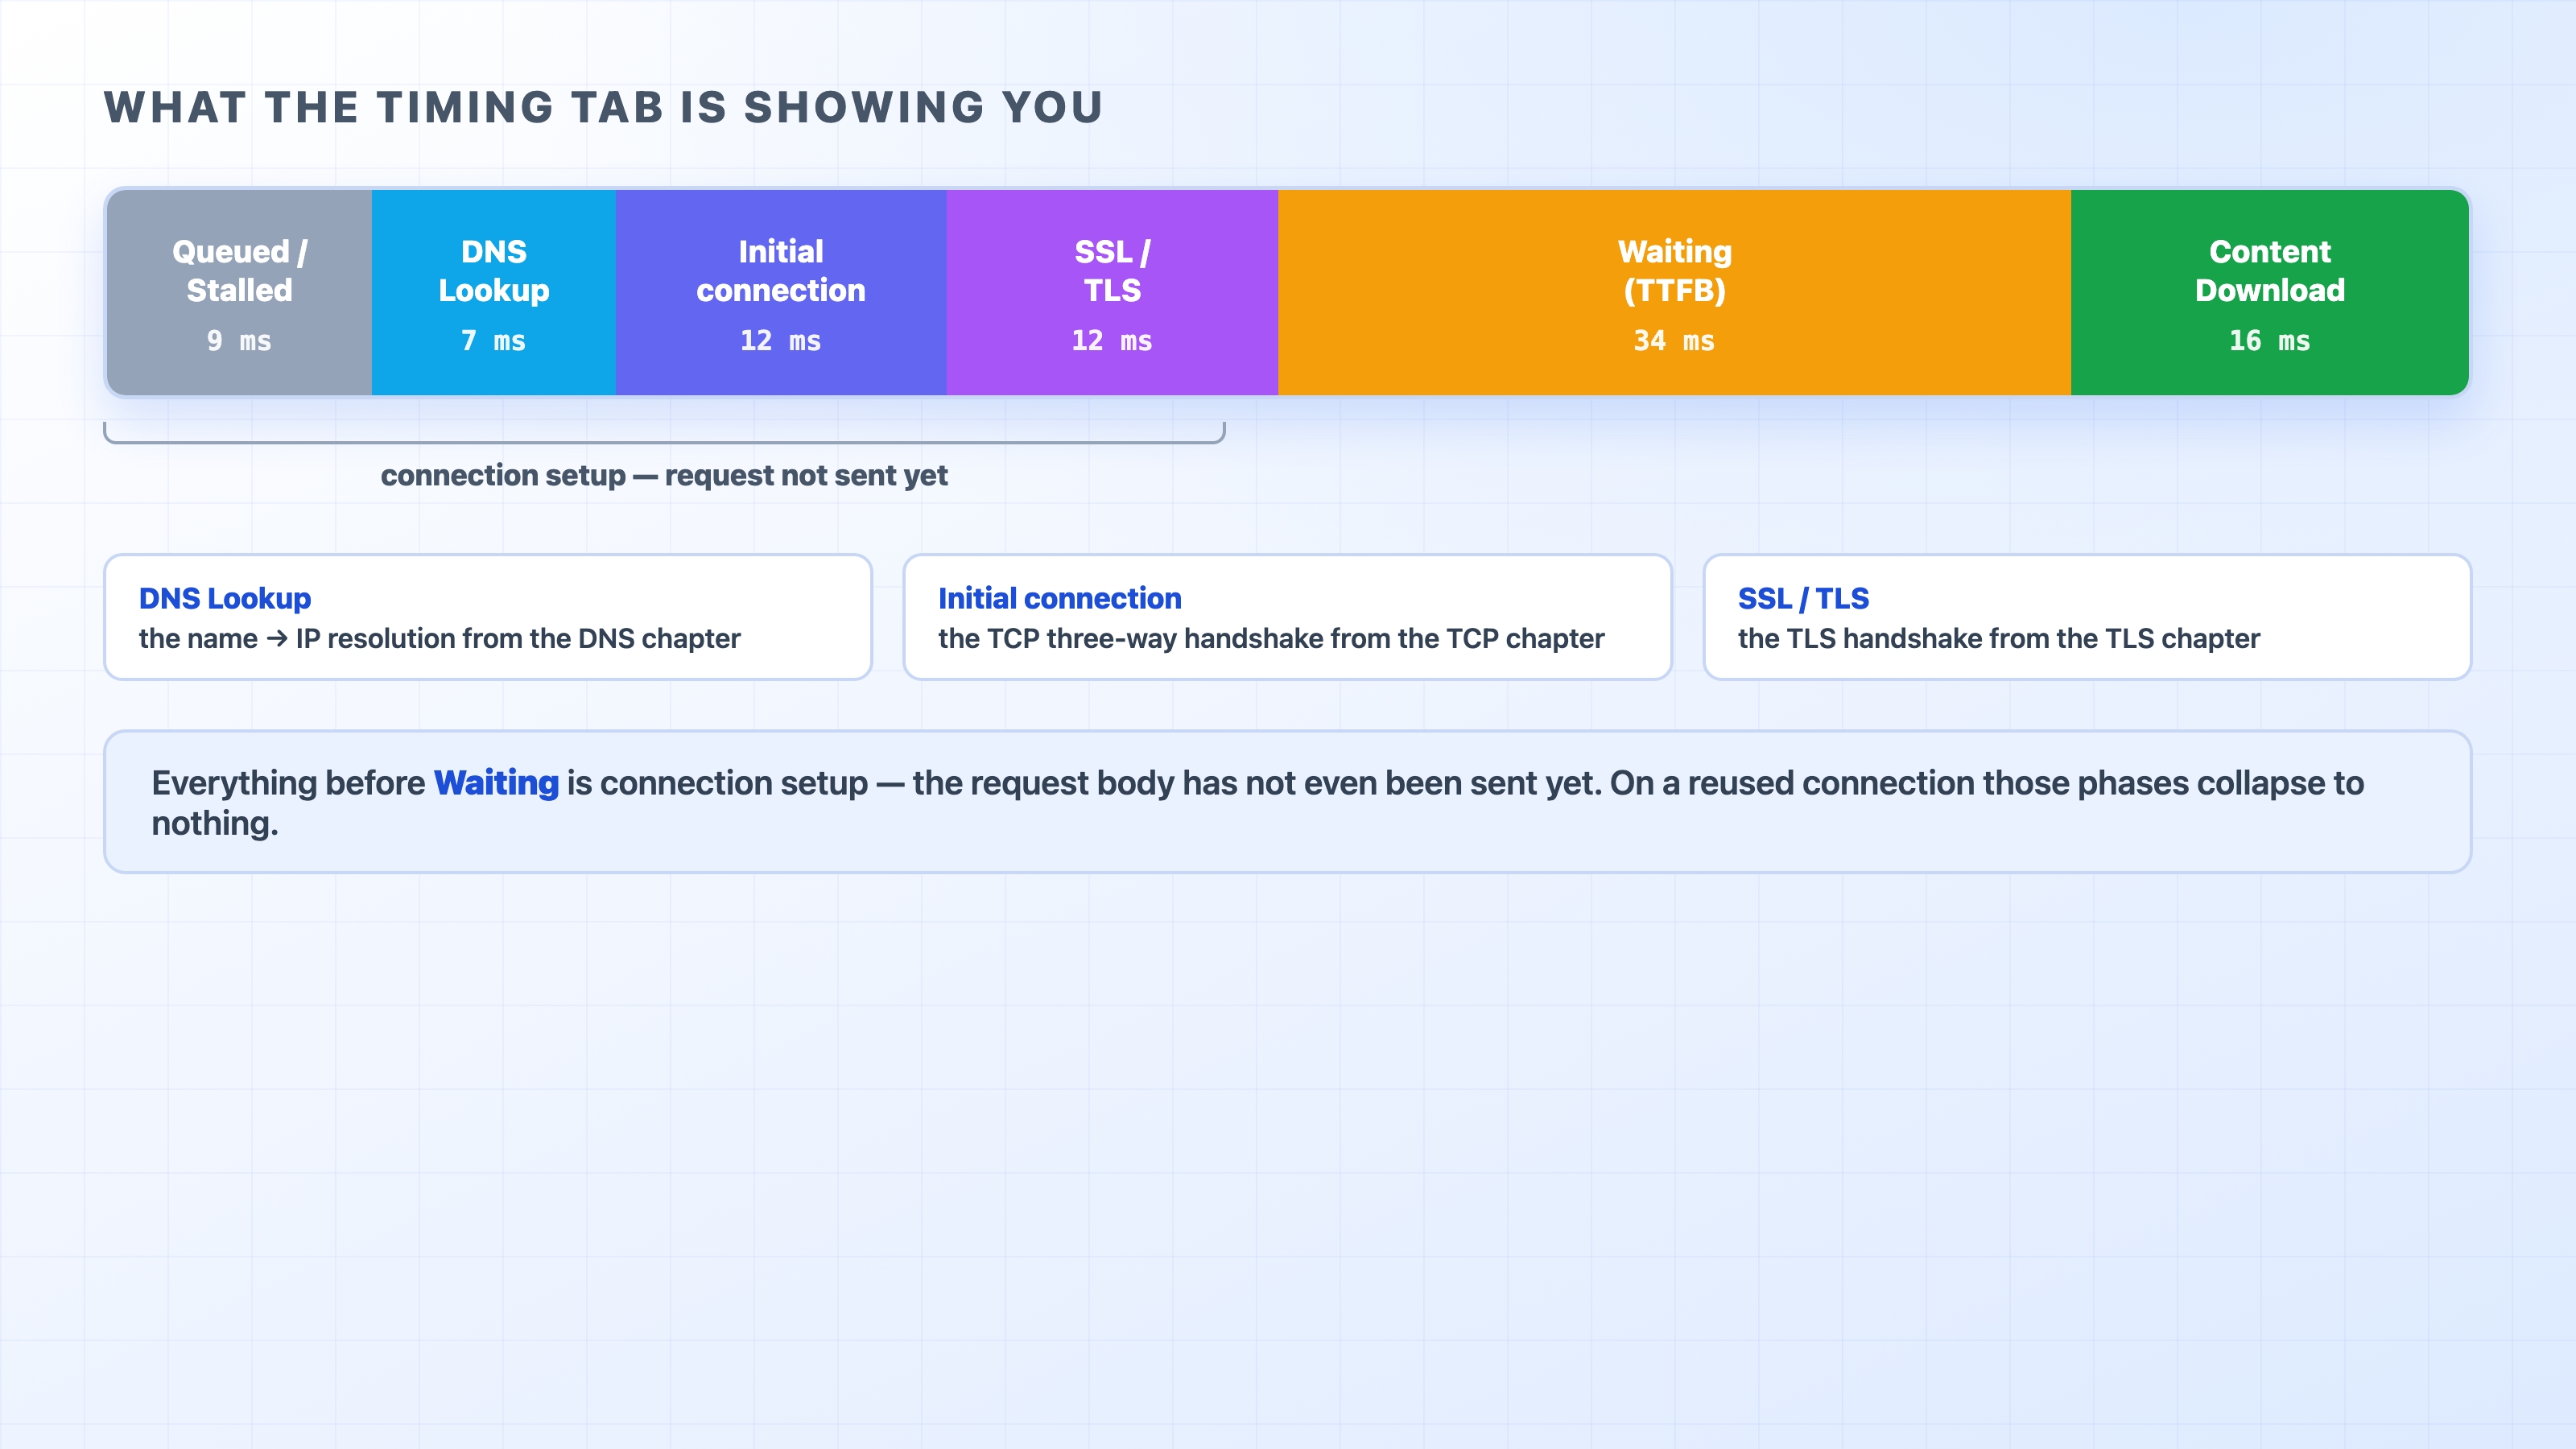
Authorization header went out, what Content-Type came back, or which Cache-Control rules the server set.POST or PUT. If you sent JSON, you will see the JSON payload. If you submitted a form, you will see the form fields.The Time column tells you a request was slow. The Timing tab tells you why. It splits the request's lifetime into phases, drawn as a stacked bar. Each phase maps directly onto a networking layer we covered earlier in the course.

Reading the bar from left to right:
http:// page, this phase is absent.The real insight from this bar is that everything before the Waiting phase is just connection setup. DNS, the TCP handshake, and the TLS handshake all happen before your request body is even sent. This visually explains why connection reuse and keep-alive matter so much. It is also why the first request to a new host is slower than the rest. On later requests over the same connection, those early phases collapse to zero, and the bar is almost entirely Waiting and Content Download.
A common confusion: A slow total time with most of it spent in the Waiting phase is a backend problem. The server is slow to respond. However, a slow total time with most of it spent in Content Download is a payload or bandwidth problem. The response is simply too big. These two scenarios look identical in the main Time column, but they look completely different in the Timing tab. Knowing that distinction changes how you fix the problem.
These numbers are usually small and add up quickly, so try not to over-interpret a few milliseconds here or there. The point of the breakdown is the overall shape. Seeing which phase dominates tells you exactly which layer to suspect.
Our earlier caching chapter spent a lot of time on what should be cached. The Network panel shows you what actually was cached. If you look at the Size column, you will notice that when a response is served from the cache, the byte count is replaced with a label:
(memory cache): Served from the browser's in-memory cache. This is instant, but the cache is cleared when you close the tab. You will usually see this for assets reused within the same page session.(disk cache): Served from the browser's on-disk cache. This survives a browser restart and is still much faster than a full network round trip.A 304 Not Modified status is a different kind of caching win. In this case, the browser did talk to the server. It sent a small conditional request using the ETag or Last-Modified headers we covered during cache validation. The server confirmed the cached copy was still good, so it did not send the file body back. A 304 costs a network round trip, whereas a memory or disk cache hit costs nothing. Still, both are much faster than re-downloading the entire file.
This is also where your reload habits matter. A normal page reload uses the cache wherever it is allowed to. A hard reload (Cmd+Shift+R on Mac, Ctrl+Shift+R on Windows/Linux) tells the browser to ignore the cache entirely and fetch everything fresh. A hard reload is exactly what you want when you are testing whether a code fix actually shipped, rather than accidentally looking at a stale cached file.
The Network panel makes two more concepts obvious without any extra tooling.
Redirects show up as their own distinct rows. If you request http://github.com, you will see a 301 row whose response points elsewhere, followed by a new row for the page it finally landed on. If you have "Preserve log" checked, the entire chain stays visible. This makes a redirect loop—where the same 301 repeats, or a chain never reaches a 200—immediately obvious as a stacked list of redirect rows. It is the exact same chain you would follow in the terminal with curl -L, just drawn out visually.
The HTTP version is visible in the Protocol column we mentioned earlier. If you do not see it, right-click the column header and enable "Protocol". Seeing h2 or h3 confirms the site successfully negotiated HTTP/2 or HTTP/3. Seeing http/1.1 tells you it fell back to the older version. You do not need a special command to check this; you just read the column.
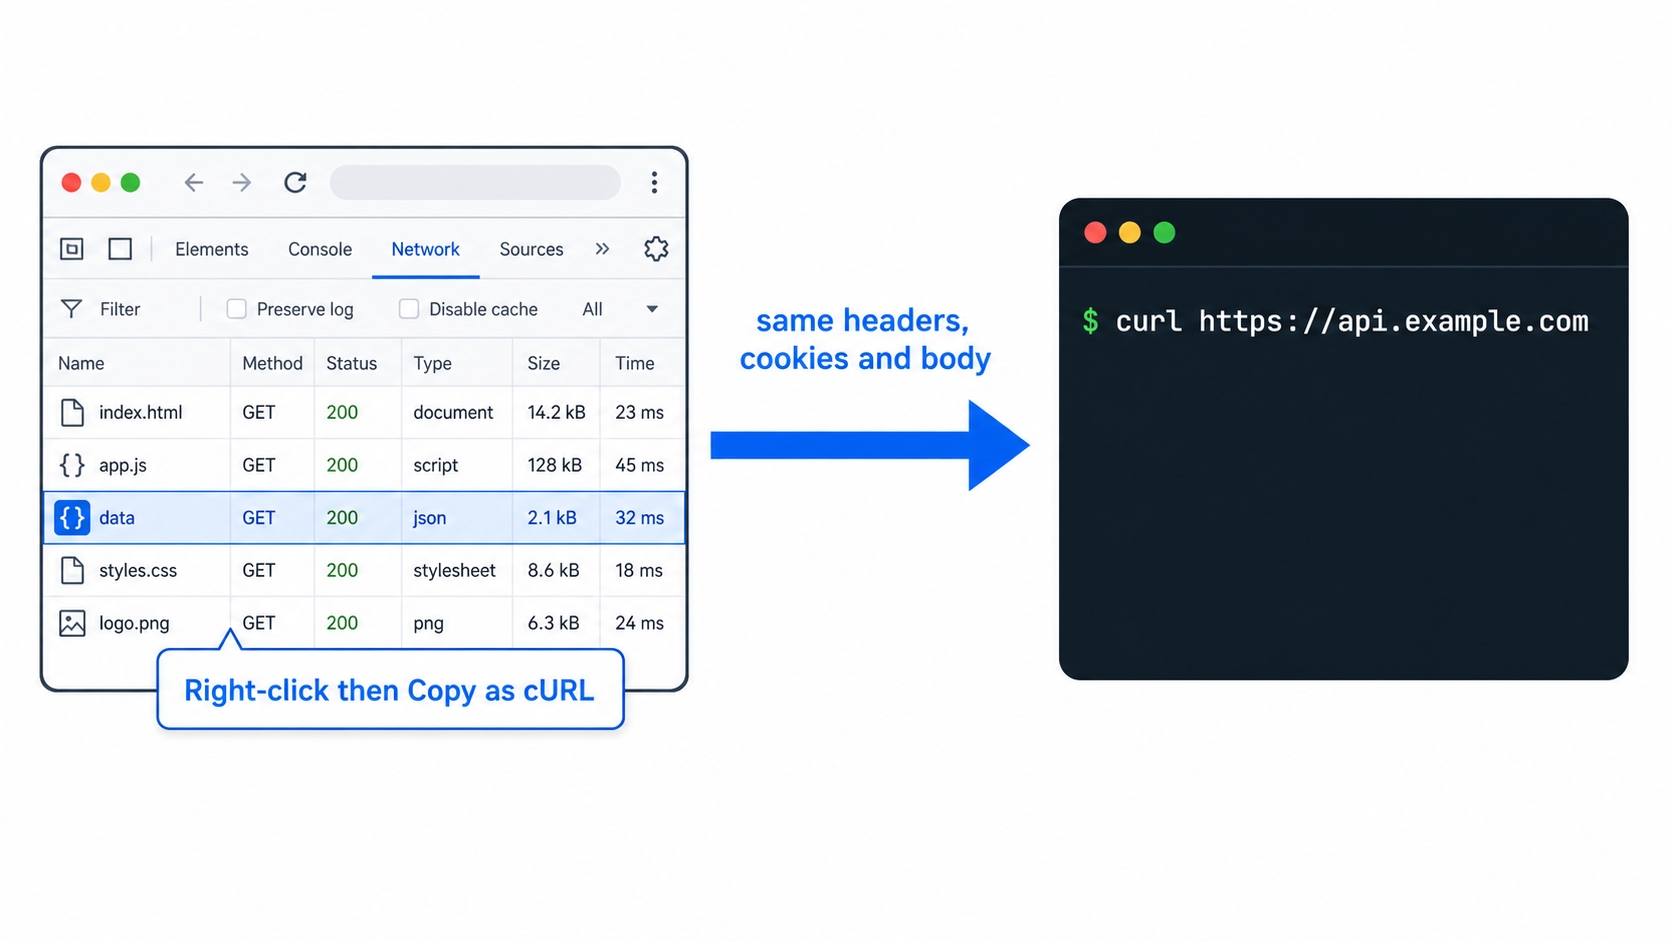
Sometimes you find a broken request in the panel and want to test it repeatedly. You might want to change a header, drop a cookie, and run it ten more times. Doing that by clicking through a browser interface is slow. Fortunately, the browser has a built-in bridge for exactly this scenario.

Right-click any request in the table and choose Copy → Copy as cURL. The browser will copy a complete curl command to your clipboard for that exact request. It includes the same URL, the same method, every header the browser sent, the cookies, and the request body. If you paste it into your terminal, you will reproduce the browser's request precisely, entirely outside the browser.
This matters for two reasons. First, it removes the browser from the equation. If the curl command fails in the exact same way, you know the bug is on the server, not in your front-end code. Second, it gives you a starting point that you can edit freely without the browser fighting you.
Open any website you use often. Open DevTools, click the Network tab, and reload the page so the table fills with rows.
(memory cache) or (disk cache). This is your second visit reusing what the first visit already fetched.In just one minute, you found a page's slowest request and explained exactly why it was slow, using nothing but the browser. This is why the Network panel earns its place as your primary debugging tool.
The "Copy as cURL" feature you just learned is the perfect handoff. Next, we will move into the terminal and drive HTTP with curl directly, so you can reproduce and isolate any request byte by byte.