The last chapter ended with Copy as cURL: you right-click a request in the Network panel and the browser hands you the whole thing as a curl command. This chapter is about what you do next. The browser is great for seeing a request; curl is for driving one. It runs the same request with nothing else in the way, prints exactly what went out and came back, and lets you change one byte and run it again.
That makes it the sharpest isolation tool you have. When something is broken and you are not sure whether to blame your front-end code, the network, a proxy, or the server, curl lets you ask the server directly and read its honest answer.
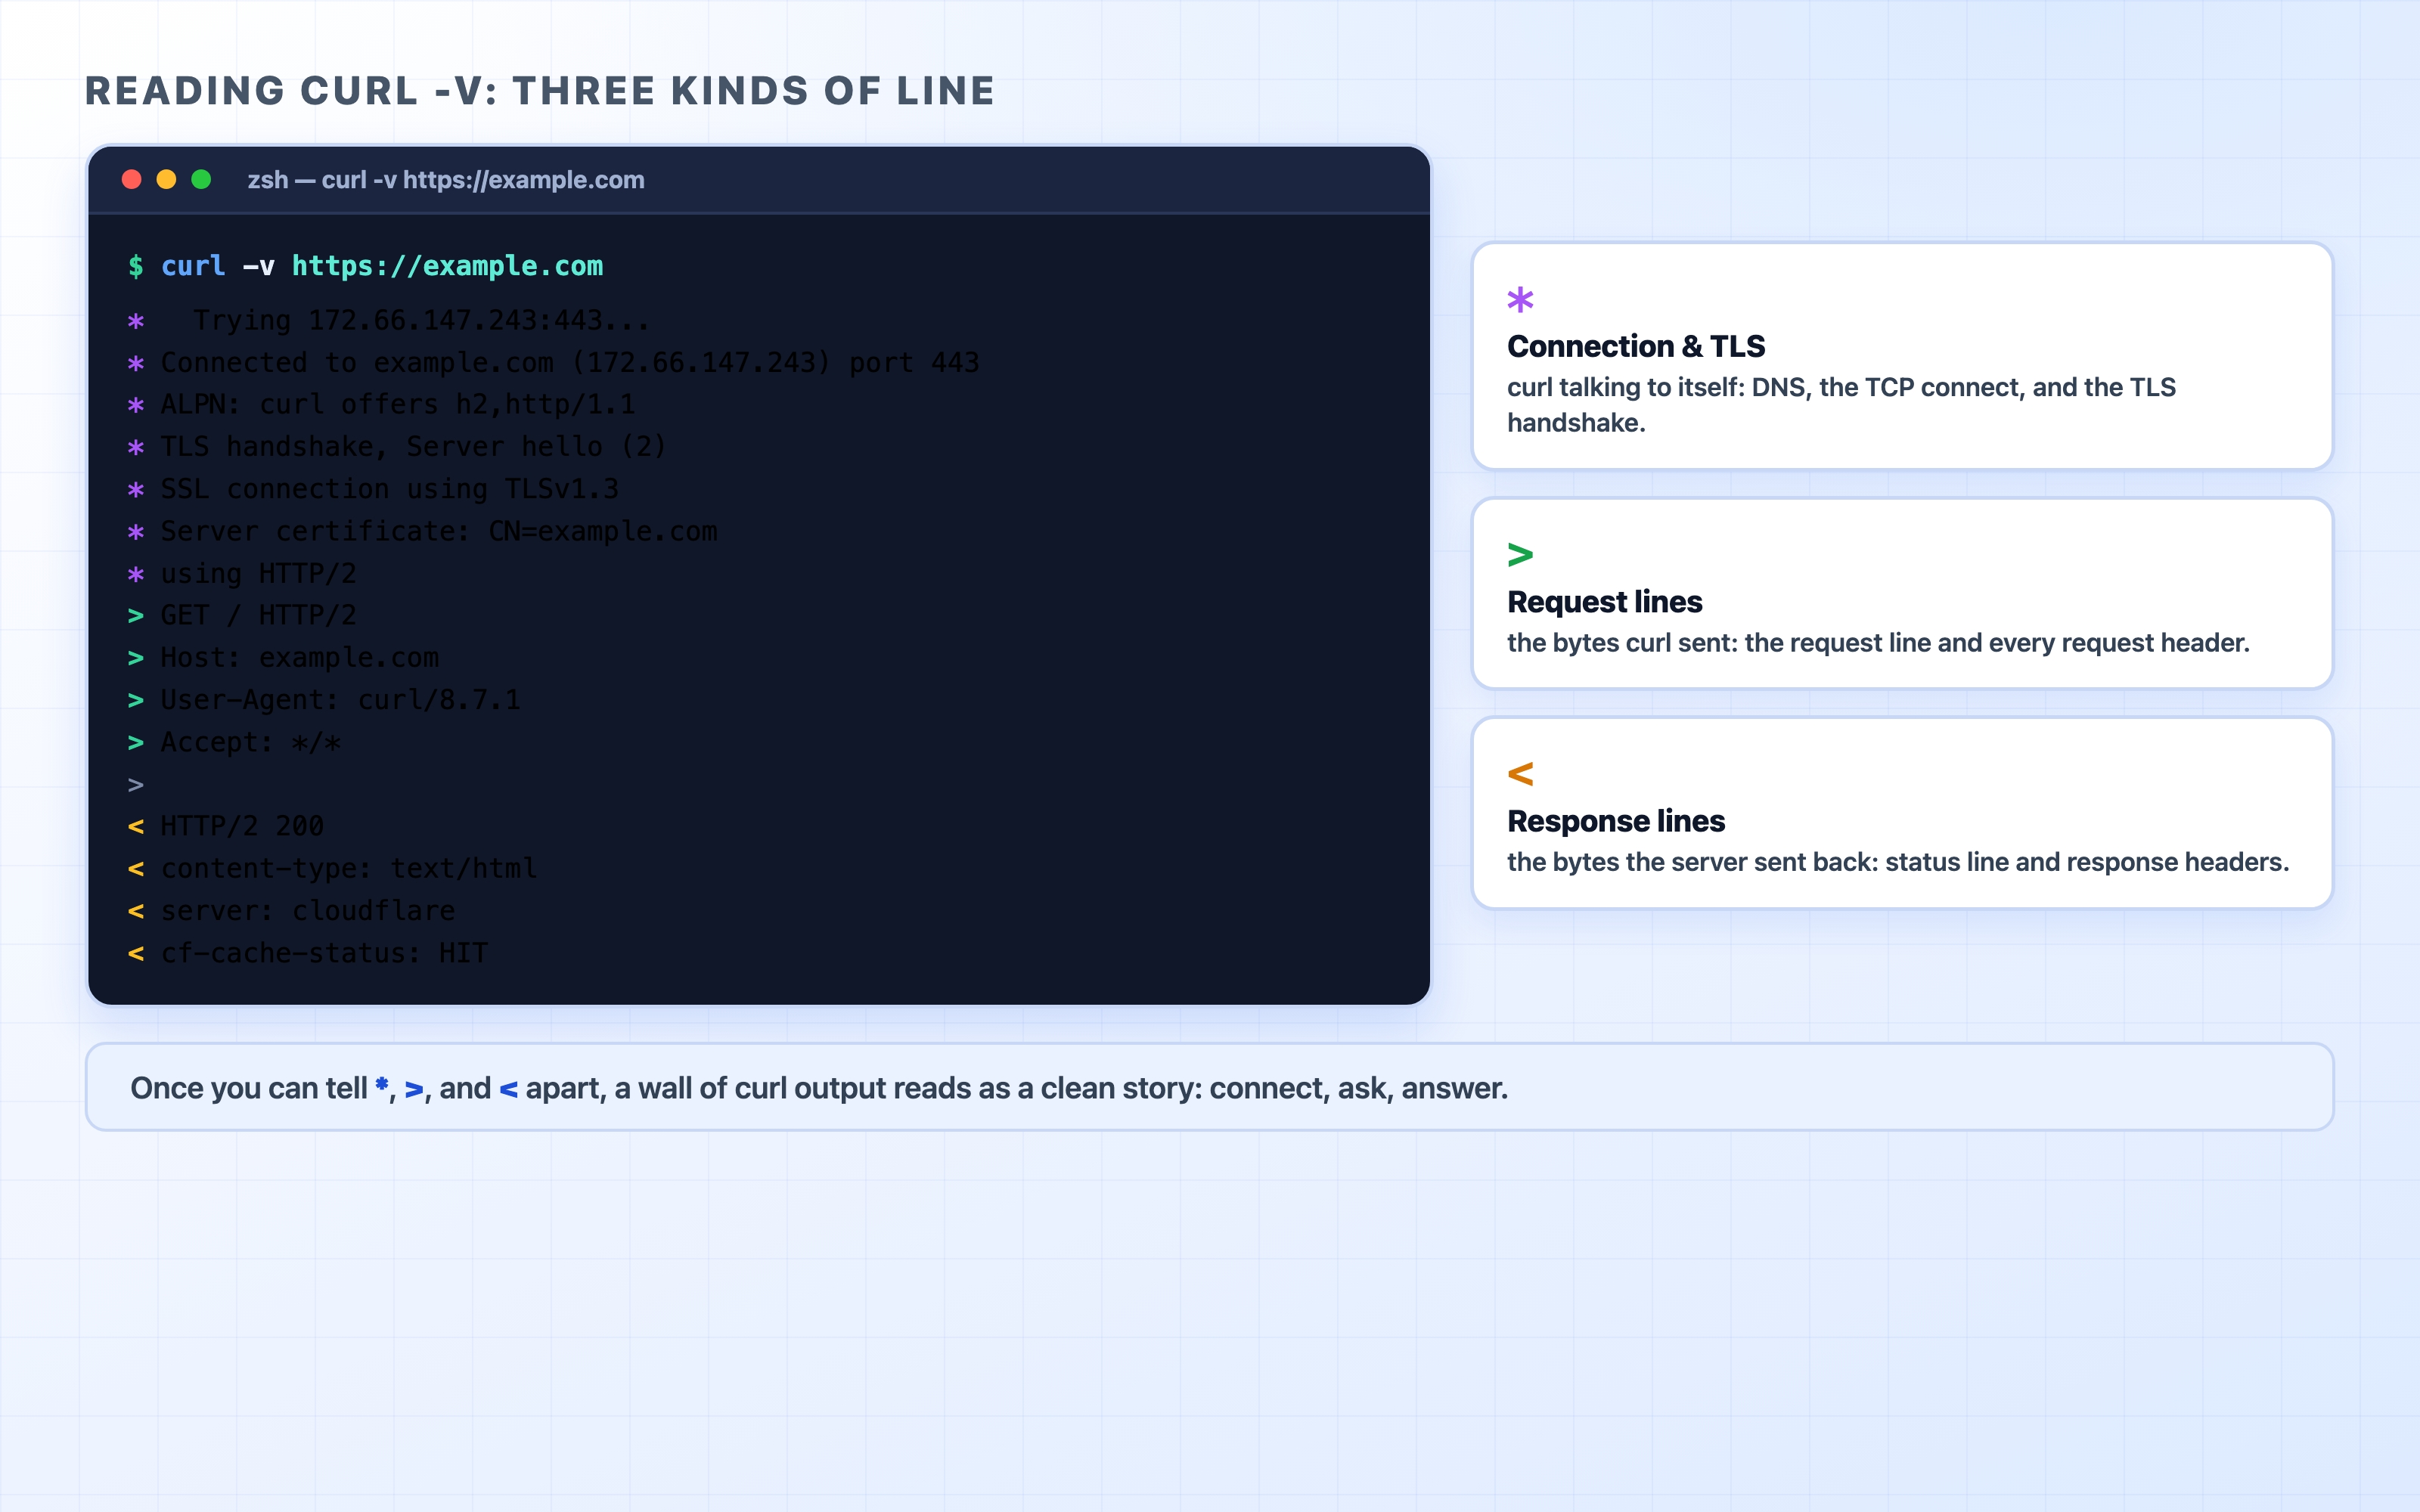
Reading curl -v: the most important habit
Most of curl's value is unlocked by one flag: -v (verbose). Without it, curl prints only the response body and stays quiet about everything else. With it, curl narrates the whole exchange — the connection, the request it sent, and the response it got back.
The trick to reading that output is noticing that every line starts with one of three symbols.
Reading the three kinds of line in curl -v output
Run it against a real site:
curl -v https://example.com
bash
Here are the lines that matter, lightly trimmed:
* Trying 172.66.147.243:443...
* Connected to example.com (172.66.147.243) port 443
Lines starting with * are curl talking to itself — the connection setup it did on your behalf. The IP it resolved, the TCP connect, the TLS handshake, the certificate it checked, and the HTTP version it negotiated. This is every layer from the DNS, TCP, and TLS sections, printed in order.
Lines starting with > are the request curl sent: the request line (GET / HTTP/2) and each request header. This is your half of the exchange.
Lines starting with < are the response the server sent back: the status line (HTTP/2 200) and each response header.
Once you internalize * > <, a screen full of curl output stops being noise. You scan the * lines to confirm the connection happened (and over which protocol), the > lines to check what you actually sent, and the < lines to see what the server replied. Most debugging is one of those three.
A small thing that confuses people: the request body, and the response body, are not printed as > and < lines. Those symbols are only for the headers. The response body is the raw HTML/JSON that curl dumps at the very end. If you want to hide that body noise while still reading the headers, that is exactly what the next flags are for.
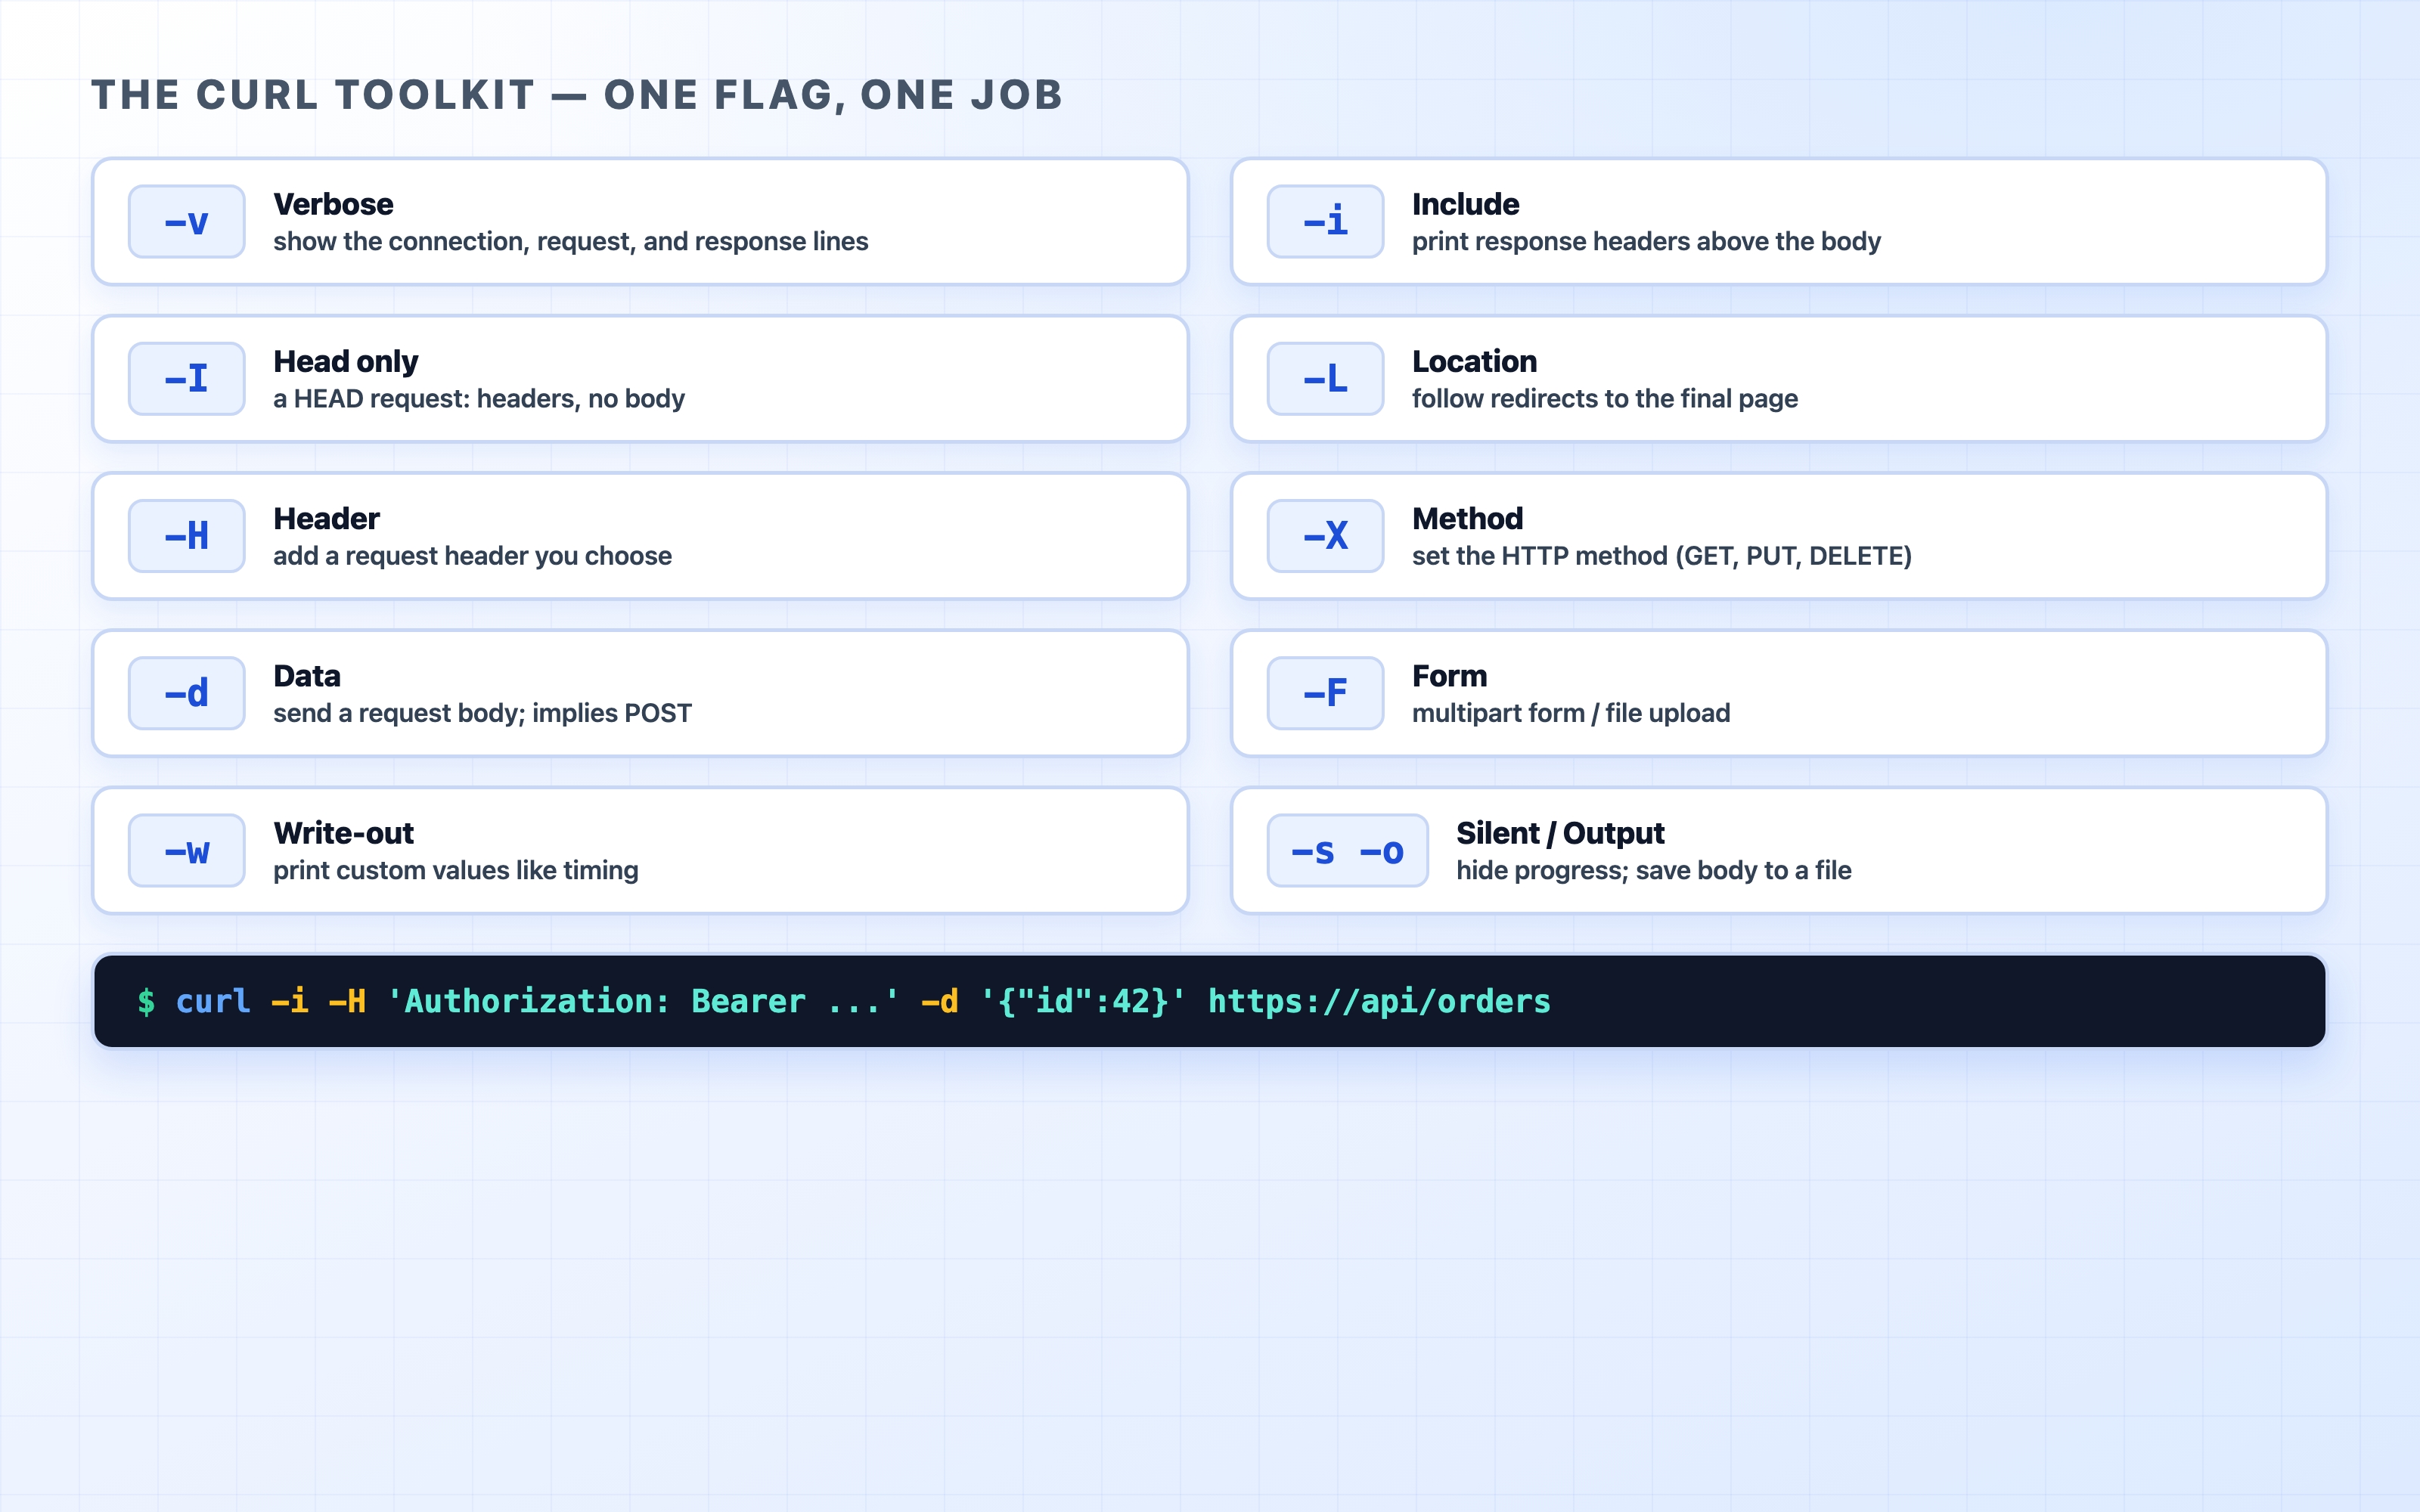
The flags as a toolkit
-v is the firehose. The rest of the essential flags are smaller tools, each with one job. You will reach for these constantly, so it is worth learning them as a set rather than looking each one up every time.
A cheat sheet of the essential curl flags
-i (include) prints the response headers above the body, without the connection chatter that -v adds. Use it when you want to see the status code and headers but do not care about the TLS handshake.
-I (capital i) sends a HEAD request: you get the headers and no body at all. Perfect for checking a status code, a redirect, or a Cache-Control header without downloading a megabyte of HTML.
-L (location) follows redirects. By default curl shows you the 301 and stops; -L keeps going until it lands on a real response.
-H sets a request header. Repeat it for as many headers as you need.
-X sets the method (-X PUT, -X DELETE). You rarely need it for GET or POST — curl picks those automatically — but it is there when you do.
-d sends a request body, and as a side effect switches the method to POST. This is how you send JSON or form data.
-F sends a multipart form, the format used for file uploads.
-w (write-out) prints custom values after the request finishes — most usefully, a timing breakdown.
-s silences the progress meter, and -o writes the body to a file (-o /dev/null throws it away). These two keep your output clean when you only care about headers or timing.
Let's use a few of them.
Headers only, with -I
curl -I https://example.com
bash
HTTP/2 200
date: Wed, 24 Jun 2026 02:23:23 GMT
content-type: text/html
server: cloudflare
last-modified: Fri, 19 Jun 2026 18:46:03 GMT
allow: GET, HEAD
accept-ranges: bytes
age: 1288
cf-cache-status: HIT
text
No body, just the metadata. This is the fastest way to answer "what status does this URL return?" or "is this response cacheable?" — you read the cf-cache-status: HIT and age lines and you have your answer in one round trip.
Following a redirect with -L
Plenty of bugs are really redirect bugs. Ask for http://github.com and watch what happens:
curl -IL http://github.com
bash
HTTP/1.1 301 Moved Permanently
Location: https://github.com/
HTTP/2 200
text
curl printed the headers for each hop: the 301 that says "go to the HTTPS version," then the 200 for the page it finally reached. This is the same redirect chain you would see as stacked rows in the Network panel, now as text you can scroll. If a site ever gets stuck in a redirect loop, this is how you catch it — the same 301 repeats and never reaches a 200.
Reproducing a request exactly
This is where curl earns its place in debugging. When an API call fails, the question is almost always: is the bug in how the client built the request, or in how the server handled it? You answer it by rebuilding the request yourself, piece by piece, until curl reproduces the failure. Then you know the server is the problem, not your code.
A real request usually has three parts you need to match: the method, the headers (especially Content-Type and any auth), and the body. Here is a POST with all three, sent to a public echo service that simply replies with whatever it received:
curl -s -X POST https://httpbin.org/post \
-H "Content-Type: application/json" \
-H "Authorization: Bearer demo-token-123" \
-d '{"name":"ada","role":"admin"}'
bash
httpbin.org/post mirrors the request back so you can confirm exactly what arrived:
{
"data":"{\"name\":\"ada\",\"role\":\"admin\"}",
"headers":{
"Authorization":"Bearer demo-token-123",
"Content-Length":"29",
"Content-Type":"application/json",
"Host":"httpbin.org",
"User-Agent":"curl/8.7.1"
},
"json":{
"name":"ada",
"role":"admin"
},
"origin":"113.29.242.17",
"url":"https://httpbin.org/post"
}
json
The reflected headers and json show the server received exactly what you intended. That is the whole technique. Start from the failing browser request (or its Copy as cURL), strip it down to the bare method, headers, and body, and run it. If it fails the same way, the server is broken or your request is genuinely malformed — either way, the front end is off the hook. If it succeeds, the difference is something the browser was adding that you left out, often a cookie or a header.
Common confusion: -d already makes it a POST. Because -d sends a body and the default method for a body is POST, you do not actually need -X POST alongside -d. People add it out of habit and it is harmless, but curl -d '...' https://... already posts. You only reach for -X when you want a method curl would not pick on its own, like PUT or DELETE.
For a file upload, swap -d for -F, which builds a multipart/form-data body:
curl reads the file, sets the multipart boundaries, and sends it the way an HTML <form enctype="multipart/form-data"> would — useful when you are debugging an upload endpoint without a browser.
A timing breakdown with -w
The Network panel's Timing tab from the last chapter is excellent, but it lives in the browser. curl -w gives you the same phase breakdown in the terminal, which means you can script it, run it in a loop, or run it from a server far from your laptop.
The -w flag takes a format string with %{...} variables that curl fills in after the request. A handful of timing variables map almost one-to-one onto the phases you already know:
curl -w "
dns: %{time_namelookup}s
connect: %{time_connect}s
tls: %{time_appconnect}s
ttfb: %{time_starttransfer}s
total: %{time_total}s
" -o /dev/null -s https://example.com
bash
The -o /dev/null -s part throws away the body and the progress meter so you see only the timings:
dns: 0.003322s
connect: 0.011628s
tls: 0.026280s
ttfb: 0.039276s
total: 0.039373s
text
These numbers are cumulative — each one is the time from the start of the request up to that point, not the length of a single phase. So the phases are the gaps between them:
time_namelookup — DNS resolution finished here. (0.003s)
time_connect — the TCP handshake finished here, so TCP took about connect − dns. (~0.008s)
time_appconnect — the TLS handshake finished here, so TLS took about appconnect − connect. (~0.015s)
time_starttransfer — the first byte of the response arrived here. The gap from appconnect to this is TTFB: the server thinking. (~0.013s)
time_total — the whole thing, including downloading the body.
The shape tells the story, exactly as it did in the Timing tab. If time_appconnect is much bigger than time_connect, TLS is slow. If time_starttransfer is far past time_appconnect, the backend is slow to respond. If the gap from time_starttransfer to time_total is large, the body is big or the link is slow. Run the same command twice in a row and watch DNS drop to near zero on the second run, since the answer is cached — the timings make connection setup visible the way the Timing tab does.
Isolating a backend with --resolve
Here is the most powerful isolation trick curl gives you. In production your request rarely hits the application server directly. It goes through DNS, then a CDN or reverse proxy, and then to the backend. When a page is broken, you want to know which of those is at fault. curl lets you skip the front of that chain and talk to a specific machine yourself.
The clean way to do this is --resolve, which tells curl "for this hostname and port, use this exact IP — don't ask DNS." It overrides name resolution for one command:
curl -s -o /dev/null \
-w "ip=%{remote_ip} status=%{http_code}\n" \
--resolve example.com:443:104.20.23.154 \
https://example.com
bash
ip=104.20.23.154 status=200
text
The request still uses the hostname example.com everywhere it matters — the Host header, the TLS certificate check, SNI — so the server treats it as a normal request for that site. But the bytes go to the IP you named, not whatever DNS would have returned.
Why this matters: it lets you point at one specific server behind a load balancer or CDN and ask it directly. If you have three backend IPs and one is misbehaving, you can --resolve to each one in turn and find the bad one. If the public URL is failing but hitting a backend IP directly works, the problem is in front of the backend — DNS, the CDN, or the proxy — not in the application. That single comparison eliminates whole sections of the request path. It is the terminal version of "bypass the browser," taken one step further: bypass the routing too.
Common confusion: --resolve vs editing your hosts file. Both pin a name to an IP, but --resolve does it for one curl command only, with no root access and nothing to undo afterward. Editing /etc/hosts changes it for your whole machine until you remember to revert it — which is exactly the kind of forgotten override that causes its own mysterious bugs later.
Try it now
Open a terminal. Every command here runs against a real public endpoint, so you can follow along immediately.
Read a verbose exchange. Run curl -v https://example.com. Find one * line, one > line, and one < line, and say out loud what each one is: a connection step, something you sent, something the server sent back.
Run it twice. Notice dns drop close to zero the second time — that is your machine's DNS cache.
Reproduce a request. Send a JSON POST and read it echoed back:
curl -s -X POST https://httpbin.org/post -H "Content-Type: application/json" -d '{"hello":"world"}'
bash
Confirm the json field in the reply matches what you sent. You just rebuilt a request from scratch and proved exactly what arrived at the server.
In three commands you have read a full HTTP exchange, measured where its time went, and reproduced a request precisely — all without a browser anywhere in sight.
What's Next
With curl you can now reproduce and isolate any request from the terminal. Next we use that skill to read the errors you hit most often, including the two gateway errors that get confused all the time: 502 versus 504.